

Image optimisation is a great way to start in increasing your website speed. First of all, you need identify some technical details regarding your website. Here are some questions that you should be able to answer:
- How is your website produced – is it static HTML or does it use a content management system like WordPress, Joomla etc?
- Where is your website hosted?
- Have you got access to your website dashboard or server so you can access and amend website content and files?
- How is the website backed up – has a restore of a past backup been tried and tested?
In this article we will focus on image optimisation.
Image optimisation and compression
Your images can slow down your website significantly. Modern mobile phones routinely take high resolution images that regularly have dimensions of sizes often up to 4000 pixels and files sizes of about 4 MB. This is much too big to display efficiently on modern devices even with high-speed website connections via broadband or 5G.
Using raw images will make your website grind to halt very quickly so you need systems in place for reducing the size of your images, without sacrificing the quality of the image as it displays on a web page or app.
This process is called image optimisation. There are important benefits.
Benefits of image optimisation
Here are some benefits of image optimisation:
Better user experience – Making your site easier to browse can boost customer loyalty and lead to smoother conversions. If you have poorly optimised images that take an age to load, or don’t display on different devices, your site could be in impacted.
Better SEO performance – optimised images can help your website perform better in search results.
Better accessibility – by adding information like Alt tags and descriptions your images will become more useful to those with disabilities and users in developing countries. Adding in things like images with alt text, to help screen readers describe the pictures to those who are partially sighted can make your pages more inclusive.
Easier storage and retrieval. Optimised images are also far easier to manage at the back end. Smaller images take up less space on your server, hard drive and cloud storage. This makes them easier to upload and download. Plus, you can store far more of them than data-heavy high-res images.
How to optimise images for a website
Image sizes
When you’re optimising images for a website, reducing file size is a key priority. However your images should still be appealing and informative.
Optimising images individually can be done using your graphics package like Adobe Photoshop. We use the excellent online graphics service Photopea and that has good options for saving an image in different file formats.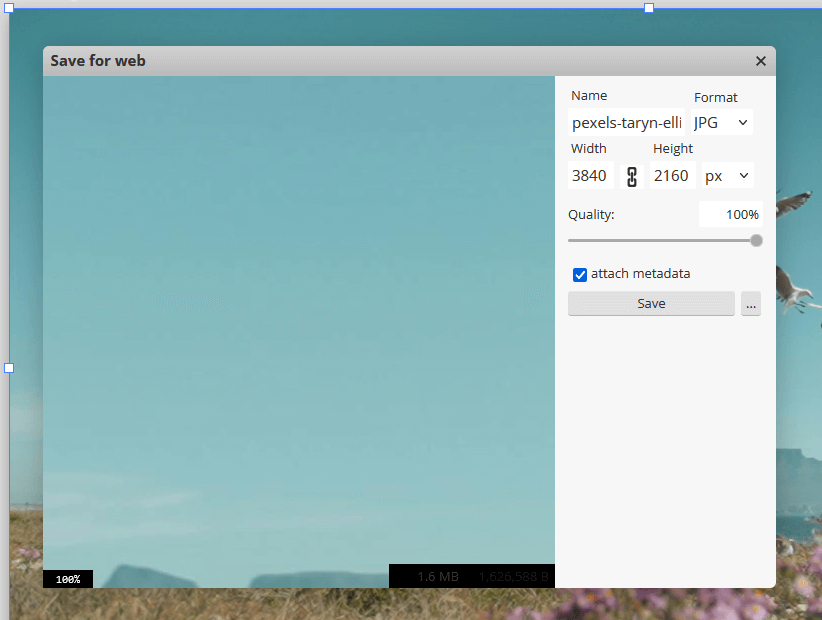
Tweak the image size and the quality of the image. The commonly held standard for web-optimised images is 72 pixels per inch (PPI). This should look great on different devices, and keep your page loads fast. If you’re displaying your images on a HD screen, meanwhile, you can go higher.
Getting your image dimensions right is also important. For the most part, they should be relatively similar to the size at which they will be displayed. Generally, photos and graphics of around 1000 pixels wide should sit nicely on different devices. But logos and icons should be considerably smaller — normally between 100-600 pixels wide.
Large monitors are about 1920 pixels so anything bigger is a waste of time.
File types
There’s a whole host of file types out there to choose from. Here are some common choices:
- JPEGs are the everyday image file you find on browsers and smartphones the world over.
- GIFs are ubiquitous online due to their ability to create a simple animation of several images. They’re perfect for simple graphics and social media memes.
- PNGs support transparency. They’re a great choice for logos and graphics on different pages and backgrounds.
- WebP files are becoming more and more popular. These allow for quality images online, using relatively small file sizes.
Logos and other designed images will probably be made in so-called Vector formats which will need to converted to one of the above formats to display on the web.
There are two type of compression you should be aware of:
- Lossless compression reduces file sizes without losing any significant data. To do this, the compression algorithm stores certain details of the image elsewhere, so you can revert back to the original file later. Some examples of common lossless picture files include PNG and RAW.
- Lossy compression is the opposite. It permanently discards image data to make it easier to save, store and transfer a file. You’ll get a far smaller file size than lossless equivalents — but this comes at the cost of a gradual (and irreversible) decline in image quality. JPEGs are a common lossy picture file type.
Your graphics package should enable you to optimise multiple images
There are also excellent online image optimisation services such as tinypng.com that can automate the process. Their premium services are also well worth the investment.
That covers image optimisation for the web. In the next article we will cover more technical aspects of improving website speed.
Get in touch with Dinesh on 07941 686113 or contact us if you need help on web design, web hosting, SEO services or domain names. See our earlier article on improving website speed.